Form and Fitness
Form and Fitness
Your form is determined by fitness, fatigue and performance and follows the Banister model.
The underlying principle is that fatigue decreases faster than fitness, which results in performance.
Fitness and fatigue themselves are a result of your training efforts.
You can also think of fitness as your endurance capacity, which you can only draw upon if you are also performant, i.e. recovered.
Form elements and guide values
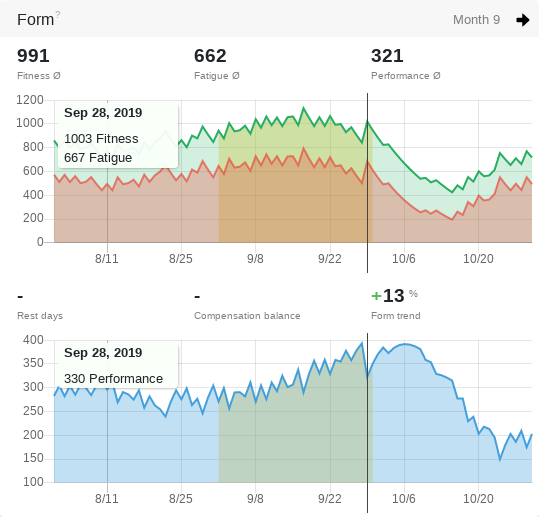
Fitness
Your fitness (green) is formed by the effort you aggregate through your activities. It is therefore an indicator of how much you have trained in the last weeks and months. At the same time, if you don't put in enough effort, your fitness level will drop steadily. So to achieve and maintain a high level of fitness, it requires regular training.
Fatigue
Your fatigue (red), just like fitness, is formed from the effort caused by your activities. If you have been exercising a lot lately, you will be more tired. However, fatigue drops off faster than fitness! The resulting gap between fitness and fatigue then compensates for the training stimuli you have set.
Performance
Your performance (blue) is the difference between fitness and fatigue. It is a good indicator of your compensation status. If your performance drops, then you have been training a lot lately and your body cannot compensate quickly enough. This may well be part of a training strategy and deliberate. As your performance increases, you compensate for the training stimuli and you recover. A training effect sets in! You can also read off a so-called supercompensation here. This occurs when you manage to achieve a higher level of performance than at your last performance plateau.
Compensation balance
The compensation balance shows you how far you are from the last performance plateau (training peak). A negative compensation balance means that you have to compensate in order to regain the level of your last performance. A positive compensation balance tells you that you are in the supercompensation phase. So this value is a helpful indicator to show you if you are recovering (compensating) or already recovered (super compensated).
Compensation days
With the compensation days you can determine how long it takes until you have regained the performance of the last performance plateau (training peak). This value, in combination with the compensation balance, is a helpful indicator for how you can schedule the next training sessions.
Neutral effort
The Neutral Effort shows you how much effort you can expend before you have dropped to the performance of the previous training session. This allows you to fine-tune your next workout. This way you can decide whether you want to continue to compensate or set stronger training stimuli. This value is only displayed when you are in supercompensation.
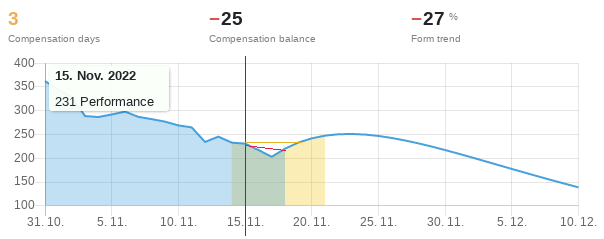
Form trend
The form trend shows you the trend of the performance for the period set in the diagram.
3-week trend
The trend period spans 3 weeks in retrospect. In other words, from 21 days ago to "today". The form trend is thus formed from all values contained in this period.
Period trend
Click on the black arrow in the top right-hand corner of the form card to set the period to the selected week or month of the calendar. In the evaluation, the period is determined by your selection with the period sliders. If you are in the planning mode for a training session, the time period goes up to the date of the planned training session.
Training balance
A longer training phase can be observed over the entire period, by a reasonable balance between fitness and fatigue.
Temporarily tiring training stimuli may and should be set.
Recovery is just as important for a positive training effect to give the body the opportunity for supercompensation.
Determining recovery correctly
After a workout, your performance has decreased because you are exhausted.
By looking at your compensation days (often called rest days), you can see how much you need to sleep to reach your previous performance level again.
The compensation balance shows you the exact difference in the performance value.
With appropriate levels of training effort, you will have better fitness than before training.
Determining training effort correctly
The effort of a training session influences the increase in fitness and exhaustion equally.
With a look at the Neutral Effort you can see how high the effort can be in order not to fall below the performance level of the previous training.
You can think of the neutral effort as a guideline. Strong or combined training stimuli may also greatly exceed the neutral effort.
Well rested for the competition
In the last weeks before a longer competition, compared to the main training weeks both fitness and performance increase significantly and fatigue decreases.
You can see this at a glance from the form trend.
By planning your training in advance, you can also see the form curve at a glance and determine the intensity and length of your taper to perfection.
Detecting overload
If performance drops over a longer period of time, but fitness increases, this indicates an overload.